Somethings About Countersink Drill Bits
WHAT IS A COUNTERSINK BIT?
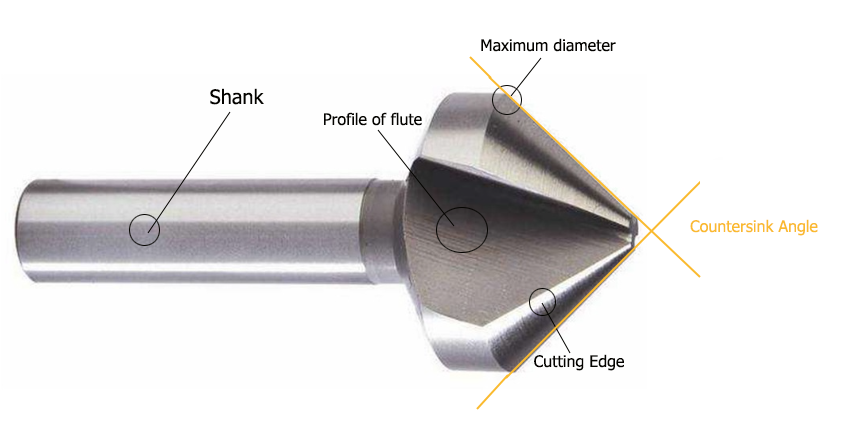
Countersink Drill Bit is a tapered hole cutting tool typically used to make the head of a countersunk screw or bolt flush with the surface of the surrounding material. Countersink tools feature a cylindrical shape and tapered tip for screw or bolt heads that require a concave surface. Countersinking also helps prevent the head of a screw or bolt from being damaged or stripped during tightening.

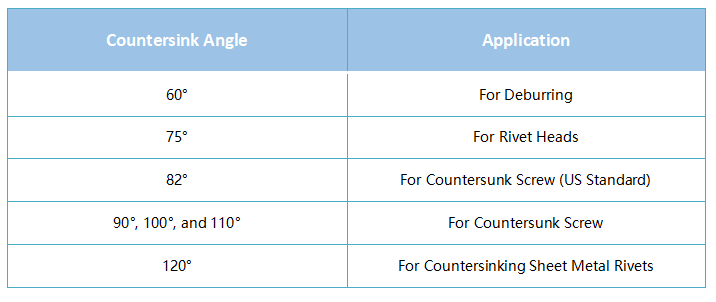
Countersinks are available in six common angles, 60°, 75°, 82°, 90°, 100°, 110° or 120°, the two most common being 82° and 90°. Different angles are used for different purposes.

How To Use A One-Piece Countersink Drill Bit
Step 1: Mark where you want to drill.
I always use my Pica marker pencil and Kreg Multi-Mark for marking. These are two of the most frequently used tools in my shop. This will allow you to precisely mark the hole’s location.
You can use an awl to create a starting point for the drill bit to make drilling the pilot hole easier. The owl-created starting point will keep the drill from wandering across the surface of the wood.
Step 2. Drill a pilot hole first
To make a pilot hole, choose a drill bit that matches the size of the screw. To know which drill to use, you can view the table with the dimensions of screws vs pilot drills here.
You can use a piece of painter’s tape to mark the depth of the pilot hole. All you have to do is stick it on the drill bit equal to the length of the screw. Don’t worry, you don’t have to be precise, the depth of the hole should just be close to the length of the screw.
Once you have made the mark, insert the bit into the drill and drill the hole until the painter’s tape makes contact with the surface of the wood.
Step 3. Drill the countersunk hole
Choose a countersink that matches the angle of the screw head. Insert the bit into the drill.
Then drill the hole deep enough to make the screw head flush with the surface of the wood. Or drill the hole deep enough to hide the screw head with a filler.
Step 4. Install the screw
Use a screwdriver or drill to drive the screw into the countersunk hole. Make sure the head of the drill fits snugly with the countersink and does not protrude above the surface of the wood. If this is the case, you can remove the screw again and perform all the steps again.
HK tools provides a variety of cutting tools and customized services just for you. Do not hesitate to reach out to us for further inquiries.
Post time: Jun-14-2023


